

NestJS middleware는 어떻게 작동할까 (1)
목표
- nestJS 미들웨어의 코드가 어떻게 구성되어 있는지 확인해본다.
- 직접 사용해본다.
- 사용해보며 문제가 있거나 / 이슈가 열려있다면 기여해본다.

Documentation | NestJS - A progressive Node.js framework
Nest is a framework for building efficient, scalable Node.js server-side applications. It uses progressive JavaScript, is built with TypeScript and combines elements of OOP (Object Oriented Programming), FP (Functional Programming), and FRP (Functional Reactive Programming).
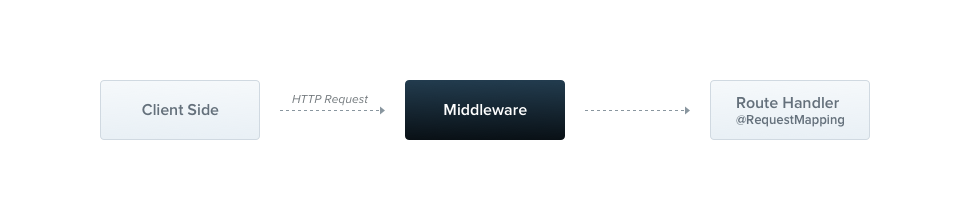
0. 미들웨어
- 미들웨어는 route hanlder 이전에 호출되는 함수이다.
- request, response 객체에 접근 권한이 있다.
- 애플리케이션의 request-response cycle에서 next() 미들웨어 함수에도 접근 권한이 있다.
1. 사용법
import { Injectable, NestMiddleware } from '@nestjs/common';
import { Request, Response, NextFunction } from 'express';

@Injectable()
export class LoggerMiddleware implements NestMiddleware {
  use(req: Request, res: Response, next: NextFunction) {
    console.log('Request...');
    next();
  }
}
- nestMiddleware를 상속한 미들웨어를 만들어서 사용하면 된다.
import { Module, NestModule, MiddlewareConsumer } from '@nestjs/common';
import { LoggerMiddleware } from './common/middleware/logger.middleware';
import { CatsModule } from './cats/cats.module';

@Module({
  imports: [CatsModule],
})
export class AppModule implements NestModule {
  configure(consumer: MiddlewareConsumer) {
    consumer
      .apply(LoggerMiddleware)
      .forRoutes('cats');
  }
}
- 모듈단에서 configure한다.
- consumer에 메소드를 체이닝해서 사용하는 방식으로 사용한다.
- 해당 예시에서는 apply(미들웨어를 등록), forRoutes(사용할 라우트들을 지정) 메소드를 사용한다.
2. 구현체 확인
export class AppModule implements NestModule {
  configure(consumer: MiddlewareConsumer) {
    consumer
      .apply(LoggerMiddleware)
      .forRoutes('cats');
  }
}
- 구현체를 확인하기 위해 진입점을 먼저 잘 찾아야한다.
- 모듈 configure 메소드를 먼저 집중해 보자. MiddlewareConsumer 클래스를 매개변수로 받아서 해당 객체의 메소드들을(apply, forRoutes, exclude..) 체이닝해서 적용하고 있다.
- 그러면 우선 살펴볼 부분은 다음과 같다.
-
- 해당 configure 메소드를 호출하는 부분 ⇒ 어떻게 여러 미들웨어가 초기화 되는가
-
- 미들웨어 적용하고 제어할 수 있는 MiddlewareConsumer 클래스 ⇒ 어떠한 원리로 하나의 미들웨어가 적용되고 제어되는가
-
3. 미들웨어의 초기화
- 해당 부분을 살펴보려면 다시 nest-factory부터 살펴보아야한다.
import { NestFactory } from '@nestjs/core';
import { AppModule } from './app.module';

async function bootstrap() {
  const app = await NestFactory.create(AppModule);
  await app.listen(3000);
}
bootstrap();
- nest의 main.ts에서 애플리케이션을 초기화하고 시동할 때 사용하는 bootstrap()입니다.
- 해당 부분에서 NestFactory.create(AppModule)하는 부분을 기억하시나요?
nest-factory.ts
// nest-factory.ts
public async create<T extends INestApplication = INestApplication>(
    moduleCls: any,
    serverOrOptions?: AbstractHttpAdapter | NestApplicationOptions,
    options?: NestApplicationOptions,
  ): Promise<T> {
    ...

    // DI 컨테이너, http 서버, 애플리케이션 설정, 그래프검사기, 옵션을 사용해서
    // NestApplication 인스턴스를 생성합니다.
    const instance = new NestApplication(
      container,
      httpServer,
      applicationConfig,
      graphInspector,
      appOptions,
    );

    // 실제 애플리케이션 인스턴스를 중간 레이어인 프록시나 인터셉터로 감쌉니다.
    const target = this.createNestInstance(instance);

    // 실제 애플리케이션 인스턴스에 위임하는 프록시를 생성해 반환합니다.
    // 적절한 http 서버 어댑터가 사용되도록 보장합니다.
    return this.createAdapterProxy<T>(target, httpServer);
  }
- 해당 부분에서 DI 컨테이너, http 서버, 애플리케이션 설정, 그래프 의존성 검사기, 옵션을 활용해서 NestApplication을 만듭니다.
- 이미 여기의 DI 컨테이너는 의존성 분석을 마치고 인스턴스화도 마친 상황입니다.
3.1 NestApplication
// packages/core/nest-application.ts
export class NestApplication
  extends NestApplicationContext<NestApplicationOptions>
  implements INestApplication
{
  protected readonly logger = new Logger(NestApplication.name, {
    timestamp: true,
  });
  private readonly middlewareModule: MiddlewareModule;
  private readonly middlewareContainer = new MiddlewareContainer(
    this.container,
  );
  private readonly microservicesModule =
    MicroservicesModule && new MicroservicesModule();
  private readonly socketModule = SocketModule && new SocketModule();
  private readonly routesResolver: Resolver;
  private readonly microservices: any[] = [];
  private httpServer: any;
  private isListening = false;

  constructor(
    container: NestContainer,
    private readonly httpAdapter: HttpServer,
    private readonly config: ApplicationConfig,
    private readonly graphInspector: GraphInspector,
    appOptions: NestApplicationOptions = {},
  ) {
    super(container, appOptions);

    this.selectContextModule();
    this.registerHttpServer();
    this.injector = new Injector({ preview: this.appOptions.preview });
    this.middlewareModule = new MiddlewareModule();
    this.routesResolver = new RoutesResolver(
      this.container,
      this.config,
      this.injector,
      this.graphInspector,
    );
  }

  // 2. middlewareModule register를 하는 registerModules를 따라갑니다.
  public async registerModules() {
    this.registerWsModule();
    ...

    // 1. middlewareModule register하는 부분입니다.
    await this.middlewareModule.register(
      this.middlewareContainer,
      this.container,
      this.config,
      this.injector,
      this.httpAdapter,
      this.graphInspector,
      this.appOptions,
    );
  }

  // 4. registerModules를 호출하는 init을 따라갑니다.
  public async init(): Promise<this> {
    if (this.isInitialized) {
      return this;
    }

    this.applyOptions();
    await this.httpAdapter?.init();

    const useBodyParser =
      this.appOptions && this.appOptions.bodyParser !== false;
    useBodyParser && this.registerParserMiddleware();

    // 3. registerModules를 호출하는 부분을 찾습니다.
    await this.registerModules();
    // 7. middlewareModule에 route를 적용하는 부분을 찾습니다.
    await this.registerRouter();
    await this.callInitHook();
    await this.registerRouterHooks();
    await this.callBootstrapHook();

    this.isInitialized = true;
    this.logger.log(MESSAGES.APPLICATION_READY);
    return this;
  }

  public async registerRouter() {
    await this.registerMiddleware(this.httpAdapter);

    const prefix = this.config.getGlobalPrefix();
    const basePath = addLeadingSlash(prefix);
    this.routesResolver.resolve(this.httpAdapter, basePath);
  }

  public async listen(port: number | string): Promise<any>;
  public async listen(port: number | string, hostname: string): Promise<any>;
  public async listen(port: number | string, ...args: any[]): Promise<any> {
    this.assertNotInPreviewMode('listen');
    // 5. init을 호출하는 부분을 찾습니다.
    // 애플리케이션이 init되지 않았을때만 init을 합니다.
    !this.isInitialized && (await this.init());

    return new Promise((resolve, reject) => {
      const errorHandler = (e: any) => {
        this.logger.error(e?.toString?.());
        reject(e);
      };
      this.httpServer.once('error', errorHandler);

      const isCallbackInOriginalArgs = isFunction(args[args.length - 1]);
      const listenFnArgs = isCallbackInOriginalArgs
        ? args.slice(0, args.length - 1)
        : args;

      this.httpAdapter.listen(
        port,
        ...listenFnArgs,
        (...originalCallbackArgs: unknown[]) => {
          if (this.appOptions?.autoFlushLogs ?? true) {
            this.flushLogs();
          }
          if (originalCallbackArgs[0] instanceof Error) {
            return reject(originalCallbackArgs[0]);
          }

          const address = this.httpServer.address();
          if (address) {
            this.httpServer.removeListener('error', errorHandler);
            this.isListening = true;
            resolve(this.httpServer);
          }
          if (isCallbackInOriginalArgs) {
            args[args.length - 1](...originalCallbackArgs);
          }
        },
      );
    });
  }

  // 6. middlewareModule에 route를 적용하는 부분
  private async registerMiddleware(instance: any) {
    await this.middlewareModule.registerMiddleware(
      this.middlewareContainer,
      instance,
    );
  }
}
- 이제 NestApplication 를 볼까요?
- 중점적으로 볼 것은 middlewareModule 클래스를 초기화하고 작동시키는 부분을 찾는 것입니다.
- 주석의 번호 순서에 따라 읽어보시면 찾아가는 과정을 보실 수 있습니다.
결론적으로 순서는 다음과 같습니다.
-
nestApplication.listen()을 호출
-
해당 listen은 프로젝트 main.ts 에서 흔히 호출하는 listen() 메소드입니다.
import { NestFactory } from '@nestjs/core';
import { AppModule } from './app.module';

async function bootstrap() {
  const app = await NestFactory.create(AppModule);
  // this one!
  await app.listen(3000);
}
bootstrap();
-
-
initialize되지 않았을 때, nestApplication.init()을 호출
-
nestApplication.registerModules()을 호출
- middlewareModule.register() 호출 - 미들웨어 모듈을 초기화 시작
await this.middlewareModule.register( this.middlewareContainer, this.container, this.config, this.injector, this.httpAdapter, this.graphInspector, this.appOptions, ); -
nestApplication.registerRouter() 호출
- registerMiddleware()을 호출 - 미들웨어 모듈에 미들웨어를 등록
 await this.middlewareModule.registerMiddleware(
      this.middlewareContainer,
      instance,
);
MiddlewareModule
export class MiddlewareModule<
  TAppOptions extends
    NestApplicationContextOptions = NestApplicationContextOptions,
> {
  private readonly routerProxy = new RouterProxy();
  private readonly exceptionFiltersCache = new WeakMap();
  private readonly logger = new Logger(MiddlewareModule.name);

  private injector: Injector;
  private routerExceptionFilter: RouterExceptionFilters;
  private routesMapper: RoutesMapper;
  private resolver: MiddlewareResolver;
  private container: NestContainer;
  private httpAdapter: HttpServer;
  private graphInspector: GraphInspector;
  private appOptions: TAppOptions;
  private routeInfoPathExtractor: RouteInfoPathExtractor;

  public async register(
    middlewareContainer: MiddlewareContainer,
    container: NestContainer,
    config: ApplicationConfig,
    injector: Injector,
    httpAdapter: HttpServer,
    graphInspector: GraphInspector,
    options: TAppOptions,
  ) {
    ...
  }

  public async resolveMiddleware(
    middlewareContainer: MiddlewareContainer,
    modules: Map<string, Module>,
  ) {
    ...
  }

  public async loadConfiguration(
    middlewareContainer: MiddlewareContainer,
    moduleRef: Module,
    moduleKey: string,
  ) {
    ...
  }

  public async registerMiddleware(
    middlewareContainer: MiddlewareContainer,
    applicationRef: any,
  ) {
    ...
  }

  public async registerMiddlewareConfig(
    middlewareContainer: MiddlewareContainer,
    config: MiddlewareConfiguration,
    moduleKey: string,
    applicationRef: any,
  ) {
   ...
  }

  public async registerRouteMiddleware(
    middlewareContainer: MiddlewareContainer,
    routeInfo: RouteInfo,
    config: MiddlewareConfiguration,
    moduleKey: string,
    applicationRef: any,
  ) {
	  ...
  }

  private async bindHandler(
    wrapper: InstanceWrapper<NestMiddleware>,
    applicationRef: HttpServer,
    routeInfo: RouteInfo,
    moduleRef: Module,
    collection: Map<InjectionToken, InstanceWrapper>,
  ) {
    ...
  }

  private async createProxy<TRequest = unknown, TResponse = unknown>(
    instance: NestMiddleware,
    contextId = STATIC_CONTEXT,
  ): Promise<(req: TRequest, res: TResponse, next: () => void) => void> {
    ...
  }

  private async registerHandler(
    applicationRef: HttpServer,
    routeInfo: RouteInfo,
    proxy: <TRequest, TResponse>(
      req: TRequest,
      res: TResponse,
      next: () => void,
    ) => void,
  ) {
    ...
  }

  private getContextId(request: unknown, isTreeDurable: boolean): ContextId {
    ...
  }
}
- 이제 위 과정의 NestApplication 에서 살펴본 middlewareModule.register() / nestApplication.registerRouter() 를 살펴보려고 합니다.
register
 public async register(
    middlewareContainer: MiddlewareContainer,
    container: NestContainer,
    config: ApplicationConfig,
    injector: Injector,
    httpAdapter: HttpServer,
    graphInspector: GraphInspector,
    options: TAppOptions,
  ) {
    // 전달된 옵션 저장
    this.appOptions = options;

    // http 어댑터에 대한 참조 가져와서 할당
    const appRef = container.getHttpAdapterRef();

    // 라우터 예외 필터를 생성
    this.routerExceptionFilter = new RouterExceptionFilters(
      container,
      config,
      appRef,
    );

    // 라우트 매핑, 미들웨어 resolver, 라우트 정보 추출기 생성
    this.routesMapper = new RoutesMapper(container, config);
    this.resolver = new MiddlewareResolver(middlewareContainer, injector);
    this.routeInfoPathExtractor = new RouteInfoPathExtractor(config);

    // 매개변수로 NestApplication에서 전달받은 인젝터, 컨테이너,
    // httpAdapter, graphInspector 초기화
    this.injector = injector;
    this.container = container;
    this.httpAdapter = httpAdapter;
    this.graphInspector = graphInspector;

    // 컨테이너로부터 모듈을 가져옴
    const modules = container.getModules();

    // 미들웨어를 reslove한다.
    await this.resolveMiddleware(middlewareContainer, modules);
  }
- NestApplication 에서 전달받은 매개변수를 받아서 할당(초기화)합니다.
- middlewareContainer를 기반으로 각 모듈에 대해 resolveMiddleware를 합니다.
resolveMiddleware
 public async resolveMiddleware(
    middlewareContainer: MiddlewareContainer,
    modules: Map<string, Module>,
  ) {
    // 모듈의 맵의 각 항목을 [key, value] 형태 배열로 변환
    const moduleEntries = [...modules.entries()];

    // 각 모듈에 대해 미들웨어 구성을 load하는 함수이다.
    // 모듈의 이름과 모듈 참조를 받는다. (key, value)
    const loadMiddlewareConfiguration = async ([moduleName, moduleRef]: [
      string,
      Module,
    ]) => {
      // 미들웨어 구성을 로드하기 위해 loadConfiguration 호출,
      // 미들웨어 구성을 처리하고 컨테이너에 삽입
      await this.loadConfiguration(middlewareContainer, moduleRef, moduleName);

      // resolver를 사용해서 모듈 내의 모든 미들웨어 인스턴스를 resolve
      await this.resolver.resolveInstances(moduleRef, moduleName);
    };

    // 위 함수 비동기적으로 모두 실행
    await Promise.all(moduleEntries.map(loadMiddlewareConfiguration));
  }
- 모듈을 모두 순회하면서, 미들웨어 구성을 load합니다.
- loadConfiguration 를 통해 모듈 내의 미들웨어 구성을 로드하고 컨테이너에 삽입합니다.
- resolveInstances 를 통해 모듈 내의 미들웨어 인스턴스를 resolve합니다.
loadConfiguration
 public async loadConfiguration(
    middlewareContainer: MiddlewareContainer,
    moduleRef: Module, // 모듈에 대한 참조, configure함수 호출
    moduleKey: string,
  ) {
    // 현재 모듈에 대한 참조에서 인스턴스를 가져옴
    const { instance } = moduleRef;

    // 모듈에 configure 메서드가 없을 경우 미들웨어를 구성하지 않고 종료
    if (!instance.configure) {
      return;
    }

    // 미들웨어를 구성하고 빌드하는데에 사용되는 MiddlewareBuilder 생성
    // 모듈마다 MiddlewareBuilder를 생성
    const middlewareBuilder = new MiddlewareBuilder(
      this.routesMapper,
      this.httpAdapter,
      this.routeInfoPathExtractor,
    );
    try {
      // 모듈의 configure 메서드를 호출하여 미들웨어 빌더를 전달
      // 모듈에서 미들웨어 구성을 수행
      await instance.configure(middlewareBuilder);
    } catch (err) {
      if (!this.appOptions.preview) {
        throw err;
      }
      const warningMessage =
        `Warning! "${moduleRef.name}" module exposes a "configure" method that throws an exception in the preview mode` +
        ` (possibly due to missing dependencies). Note: you can ignore this message, just be aware that some of those conditional middlewares will not be reflected in your graph.`;
      this.logger.warn(warningMessage);
    }

    if (!(middlewareBuilder instanceof MiddlewareBuilder)) {
      return;
    }
    // 미들웨어 빌더를 사용해서 config 빌드
    const config = middlewareBuilder.build();
    // 빌드된 config을 미들웨어 컨테이너에 삽입
    middlewareContainer.insertConfig(config, moduleKey);
  }
- await instance.configure(middlewareBuilder)
- 드디어 configure를 호출하는 부분을 찾았습니다.
- 다시 미들웨어를 적용한 예제 코드를 살펴보겠습니다.
export class AppModule implements NestModule {
  // this!
  configure(consumer: MiddlewareConsumer) {
    consumer
      .apply(LoggerMiddleware)
      .forRoutes('cats');
  }
}
-
AppModule은 configure를 통해서 미들웨어를 적용한 모듈입니다.
-
해당 모듈은 loadConfiguration 에서 moduleRef를 통해 전달될 것이고, 해당 인스턴스에는 configure 메서드가 있을 것입니다.
-
이에 따라 instance.configure(middlewareBuilder) 를 통해서 모듈의 미들웨어 구성이 진행됩니다.
-
그렇다면, 이 middlewareBuilder는 무엇일까요?
- 예제 코드에서 볼 수 있듯, configure 메소드의 매개변수로 설정된 클래스입니다.
const middlewareBuilder = new MiddlewareBuilder( this.routesMapper, this.httpAdapter, this.routeInfoPathExtractor, );- 뒷내용에서 나오긴 하지만, MiddlewareConsumer는 MiddlewareBuilder클래스의 인터페이스입니다.
- 따라서 middlewareBuilder를 매개변수로 사용한다고 생각하면 됩니다.
- 아래에서 해당 클래스를 더 살펴보겠습니다.
+ configure (module)을 통해서 어떻게 해당 미들웨어가 적용되는지?
await instance.configure(middlewareBuilder);

const config = middlewareBuilder.build();

middlewareContainer.insertConfig(config, moduleKey);
- 다음 메소드들을 하나씩 살펴보면서 어떻게 각 모듈에서 설정한대로 미들웨어가 초기화되는지 살펴보겠습니다.
await instance.configure(middlewareBuilder)
- 모듈 instance의 configure 메서드를 호출합니다.
- middlewareBuilder 객체를 매개변수로 전달합니다.
- 해당 메소드는 특정 모듈에서 미들웨어 구성을 처리, 설정을 적용하는 역할을 합니다.
- 설정된 미들웨어 정보는 middlewareBuilder 내부에 저장됩니다.
- 해당 메소드를 통해 모듈의 미들웨어 구성 정보가 담긴 middlewareBuilder가 생성됩니다.
- middlewareBuilder 객체에서는 내부적으로 middlewareCollection이라는 Set을 가지고 있는데, 해당 Set은 MiddlewareConfiguration 객체들을 저장합니다.
- 각 MiddlewareConfiguration 객체들은 미들웨어와 관련된 설정 정보를 포함하고 있습니다.
- apply() 메서드를 통해서 middlewareCollection에 추가됩니다. 추가할 미들웨어를 받아 구성하는 프록시 객체를 반환합니다. 해당 객체를 이용해서 exclude, forRoute등을 이용해 추가적인 구성이 가능해집니다.
- forRoutes() 메서드를 통해서 위에서 반환한 프록시 객체에서 호출됩니다. 미들웨어가 적용될 특정 라우트를 지정합니다.
middlewareBuilder 객체에서 정보를 저장하는 법
- middlewareBuilder 객체에서는 내부적으로 middlewareCollection이라는 Set을 가지고 있는데, 해당 Set은 MiddlewareConfiguration 객체들을 저장합니다.
- 각 MiddlewareConfiguration 객체들은 미들웨어와 관련된 설정 정보를 포함하고 있습니다.
- apply() 메서드를 통해서 middlewareCollection에 추가됩니다. 추가할 미들웨어를 받아 구성하는 프록시 객체를 반환합니다. 해당 객체를 이용해서 exclude, forRoute등을 이용해 추가적인 구성이 가능해집니다.
- forRoutes() 메서드를 통해서 위에서 반환한 프록시 객체에서 호출됩니다. 미들웨어가 적용될 특정 라우트를 지정합니다.
const config = middlewareBuilder.build();
-
모든 구성이 완료되면 build() 메서드를 통해 최종적으로 구성된 미들웨어 설정들의 배열을 생성합니다. 해당 배열은 MiddlewareConfiguration 객체 Set의 배열이며, nest 애플리케이션의 미들웨어로 등록될 때 사용됩니다.
public build(): MiddlewareConfiguration[] { return [...this.middlewareCollection]; }- 여러 모듈을 돌면서 만들어진 middlewareCollection들을 배열로 누적해서 관리합니다.
middlewareContainer.insertConfig(config, moduleKey);
- middlewareContainer 에 MiddlewareConfiguration 객체(들)을 삽입합니다.
- moduleKey는 해당 작업하고 있는 모듈을 식별하는 키입니다.
- 각 모듈에 대한 미들웨어 설정을 middlewareContainer 에 저장하여서, 나중에 미들웨어를 등록하고 사용할 수 있도록 합니다. (미들웨어 설정의 중앙화)
- 해당 부분은 middlewareBuilder 가 어떻게 구성되어있는지 먼저 확인하고, 살펴보도록 하겠습니다.
- 최종적으로 해당 메소드 이후 middlewareContainer 에서 어떻게 관리되고 NestApplication에 등록되고 사용되는지 확인하겠습니다.
이어가며
- 글이 너무 길어지는 관계로 middlewareBuilder 에 대해서는 다음 글에 이어서 작성하겠습니다.